I went deep down the NPM docs to learn more about Package.json for no good reason 💁 Enjoy.


Before we jump into what I have gathered about package.json, let me preface this by saying that this article is nothing more than a fun dive into this file that I have been creating/editing/using for the past 5+ years. Don’t expect to clear any interviews 😂
Also, this is my very first article here and I wanted to do something not javascript-y. I hope y’all enjoy this one.
What is Package.json?
If you have ever worked in a NodeJS project where it be React, Vue or even a pure NodeJS project, you must have definitely worked with it.
Package.json is the document which contains the most important metadata like packages, scripts which is required to both run and even publish the project. NPM requires you to give all the info enclosed in json format.
To generate a package.json file, type npm init in the project folder. This command will expect you to enter some details like name,description etc., You can do it or choose to ignore by pressing Enter/Return over and over. Once its done, now you have a package.json file.
Properties
There are so many properties that can be part of the package.json file. Let's see them one by one here. I'm not going to do it all because some of them are really unnecessary and boring.
name
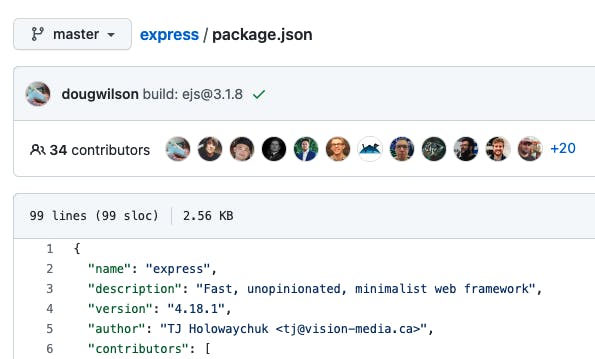
If you ever think of publishing your package, then whatever you provide for the name property will show up in github/npmjs websites. Let's see this in action.
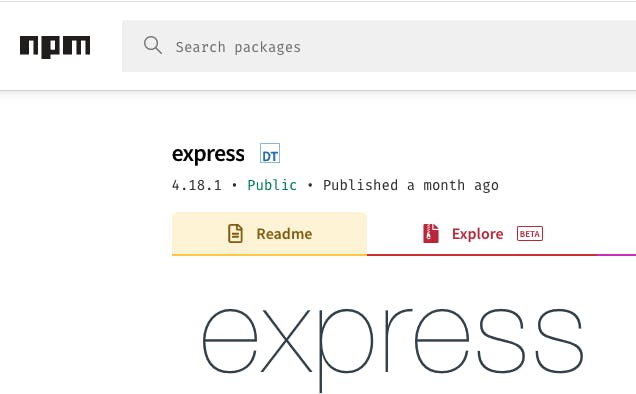
The name property of package.json in express github code looks like this.
There are a couple of things you need to remember about the name property.
- the name property should be equal or less than 241 characters.
- you can't provide any Non-url safe characters. The allowed characters are ABCDEFGHIJKLMNOPQRSTUVWXYZabcdefghijklmnopqrstuvwxyz0123456789-._~:/?#[]@!$&'()*+,;=
- Also, no uppercase characters. I'm not sure whether its not allowed or they are doing a toLowerCase() on name property.
description
This matters only if you are willing to publish the project. The npm search looks for Put a description in it. It's a string. This helps people discover your package, as it's listed in npm search. If you are not aware of the search command, its a way to search packages in the npm via terminal. The search keyword is looked against name, description and author of the package.
In the image below, I have used npm search express and you can see from the search results that the word express is highlighted in both name & description of the modules.

If the project you are working on is a personal one or even an organization project, then you can choose to ignore this altogether.
keywords
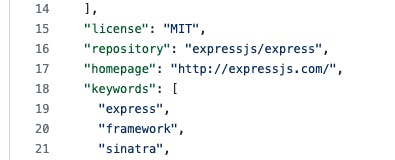
You can provide an array of strings which helps people discover your package via npm search or direct search at npmjs.com. These are the keywords for the express package.

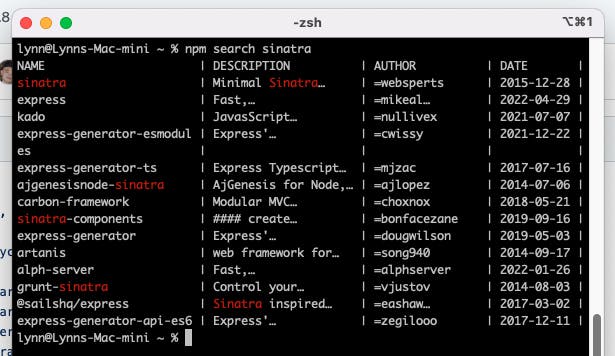
If you see, they have sinatra as a keyword (which is funny). Let's use that npmjs.com and also the terminal search. It looks like this in the terminal search and like you see, you have express in the search results for the keyword "sinatra"
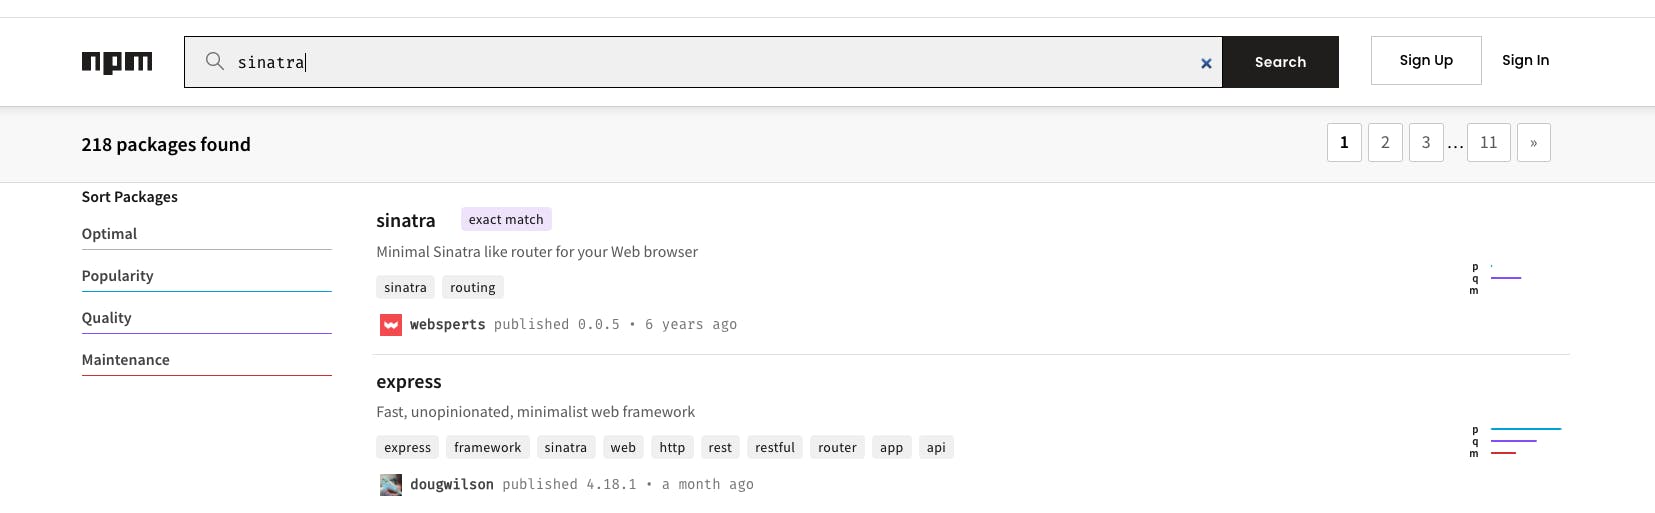
On the npmjs website, the search results looks like this. So, yeah keywords work. Also, there is actually a package called sinatra .
homepage
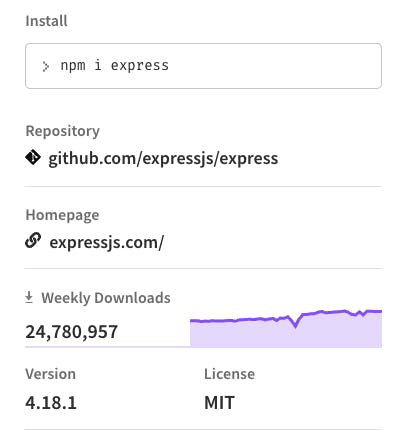
This property mainly is concerned to be with if you are going to publish it in npm or github. You can mainly reference your github or page link here so that it will appear in the npmjs website. Let's see the same in the case of express.
 Its referenced as http://expressjs.com/ in the package.json which reflects in the npmjs website as seen below.
Version
Version simply refers to the version of the project that you have published. If you are not aware of versioning, then you should check out https://semver.org/. Semantic Versioning is what is used as a standard in software engineering these days.
So, the rules of semver boils down to these three things.
- MAJOR version when you make incompatible API changes
- MINOR version when you add functionality in a backwards compatible manner
- PATCH version when you make backwards compatible bug fixes.

So, everytime you make changes and push it to npmjs or anywhere, you would update the version and push accordingly.
Bugs
If you have put your code in github, then you can put the link of the github issue tracker to the url property so that people can navigate there. Also, there is an option called email where people can report issues via email.
{
  "url" : "https://github.com/expressjs/express/issues",
  "email" : "issues@expressjs.com"
}
You will have to do it like this. You can provide either one or both url and email values.
License
License property is where you mention the type of license you are applying to your project. Its based on SPDX Licensing. If you are not aware of SPDX, its an open standard for communicating software bill of material information, including components, licenses, copyrights, and security references.
Here are some of the examples.
{
   "license" : "ISC",
   "license" : "(MIT OR Apache-2.0)",
   "license" : "(ISC OR GPL-3.0)",
   "license" : "UNLICENSED"
}
Funding
Provide links under funding so that people who want to help or support your project, they can do so. If you are a freelance developer or even a open source project manager its good if you can provide a way for people to support you.
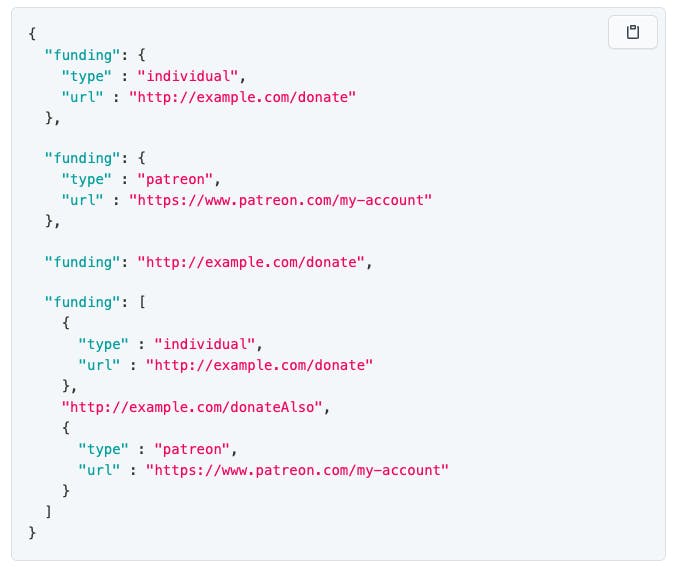
Its an array of objects, so that even if you have multiple funding links, you can provide like its done in the screenshot above. Also, I couldn't find any information on how many links you could add to this array.
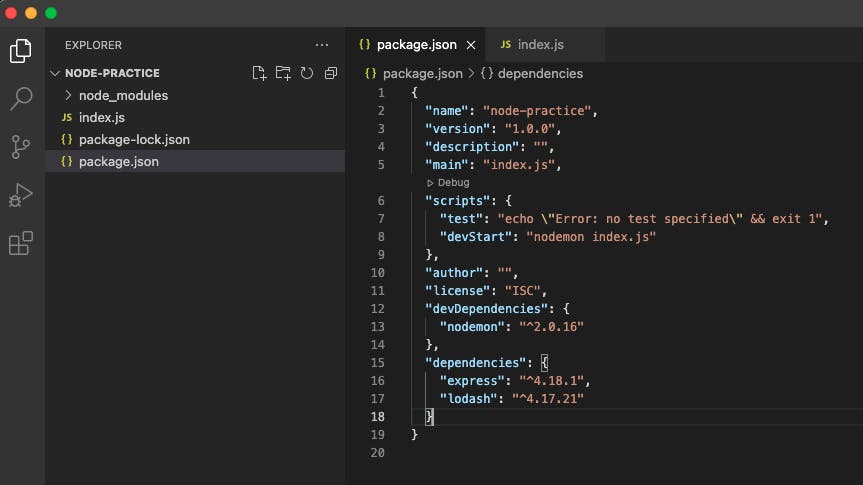
Main
You can ignore every other property in this article. But this main is the one that is kind of important if you want to serve the code to the runtime. Let's say the project is a Single Page Application that is served to the browser so, you kind of need an entry point to the project. This will be a file name or a path to a filename.
So, when you run the application, node js will start executing the contents of the file you have pointed in the main property. Mostly it will be index.js or app.js.
contributors
As the name implies, this is where you return an array of people with their details. People here refer to the major contributors to the project. If you see major projects like express, lodash, react-router you will see so many major contributors involved who help improve, enhance and maintain the project in discussion.
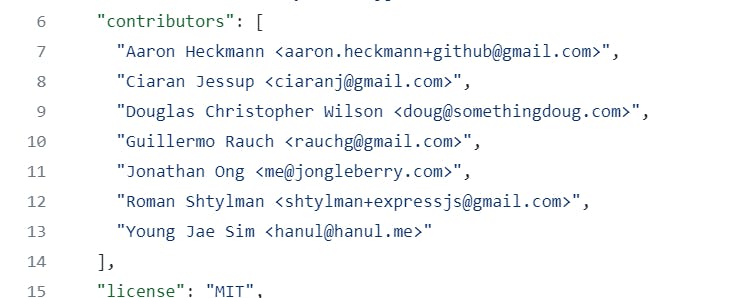
There are a couple of ways you could provide the info about contributors. The general way is to provide an array of objects with the following information.
{
  "name" : "Lynn Joseph",
  "email" : "lynnjoseph@gmail.com",
  "url" : "http://lynnjoseph.com/"
}
Another way to provide is to give it all together in a string and npm will parse it accordingly.
{
  "author": "Lynn Joseph <lynnjoseph@gmail.com> (http://lynnjoseph.com/)"
}
Repository
You can specify where you have open sourced your code (if you have). So, people who are interested in contributing to your project can do so. Mostly repositories are uploaded to Github (at least major projects) and you can check them out there.
This is the format to do so.
{
  "repository": {
    "type": "git",
    "url": "https://github.com/expressjs/express.git"
  }
}
Scripts
The scripts property is where you can provide custom command script that will run or could be executed at various time of the package lifecycle like install, start, publish etc., A basic example is to run a node js script file using nodemon. So normally you would have to execute the following command.
nodemon app.js
You can write a custom script in the package.json file for the above command like this.
{
  "scripts" : {
    "serve" : "nodemon app.js"
  }
}
The above script can be executed using the run command as
npm run serve
The "scripts" property is a dictionary containing script commands that are run at various times in the lifecycle of your package. The key is the lifecycle event, and the value is the command to run at that point.
You could also define "pre" and "post" for scripts if you want something to run before and after a particular command.
{
  "scripts": {
    "preserve": "SOME SCRIPT TO RUN BEFORE SERVE",
    "serve": "COMMAND TO SERVE",
    "postserve": "SOME SCRIPT TO RUN AFTER SERVE"
  }
}
All the three scripts in the above snippet will run whenever you run the following command.
npm run serve
Dependencies
Dependencies needs an object with package names and their versions. Dependencies refers to the node package that needs to be installed along with the project. Dependencies are installed mainly from from the npmjs site and it also allows custom packages or even submodules.
{
  "dependencies": {
    "express": "1.0.0",
    "my-package": "file:../dyl"
  }
}
If you don't know the version name that you want to add to the project, you can mention as "" against the package name which when installed via *npm install would add the latest stable version to the project.
This works vice versa as well. Let's say you are installing express package by npm install express. In that case, npm would automatically add express to the dependencies object.
devDependencies
devDependencies are similar to dependencies except for the fact that packages are not crucial to run the project can be added here. Let's say you have added to testing framework like mocha or jest to execute unit testing of your code. Those package are not relevant to someone who uses your package. They are purely for your sanity. In that case, they don't need to install those packages in their systems. So, devDependencies are meant for you and not your end user.
  {
  "devDependencies": {
    "mocha": "10.0.0"
  }
}
Testing is just an example that I used to demonstrate here. You can add any package that is purely a dependency for the development process.
peerDependencies
Sometimes, in your project, there are certain packages that need to be installed for certain packages that you need to work well. Those packages are called peer dependencies. You would never use those packages directly by require or import but they ensure that the project runs well. Those kind of packages will go under peerDependencies.
{
  "name": "tea-latte",
  "version": "1.3.5",
  "peerDependencies": {
    "tea": "2.x"
  }
}
In earlier versions of npm, peerDependencies are not installed by default. But after npm 7.x, you don't have to force install any of these.
peerDependenciesMeta
peerDependenciesMeta is basically an extension of the peerDependencies where you can add additional information like whether this package is optional or not.
{
  "name": "my-project",
  "version": "1.3.5",
  "peerDependencies": {
    "mocha": "1.2"
  },
  "peerDependenciesMeta": {
    "mocha": {
      "optional": true
    }
  }
}
You can mention those information like you see above.
bundledDependencies/bundleDependencies
There is an option to bundle the packages in a compressed file by adding the package names in the bundledDependencies/bundleDependencies property. Its an array of strings (package names) and can be bundled by using npm pack command.
{
  "name": "my-package",
  "version": "1.0.1",
  "bundledDependencies": [
    "lodash",
    "react-router"
  ]
}
You could also provide boolean value as true/false if you want to bundle all dependencies or not.
optionalDependencies
Let's say if the user runs the project and cannot find or couldn't install a particular dependency, then those could be added under optionalDependencies. It works similar to devDependencies/dependencies format-wise like an object with comma separated package names and version numbers.
{
  "name": "tea-latte",
  "version": "1.3.5",
  "optionalDependencies": {
    "tea": "2.x"
  }
}
If the end user wants to avoid these optional dependencies while installing the packages, he can do so by choosing install like this.
npm install --no-optional
engines
With engines property, you can specify in which node version your code/project works well.
{
  "engines": {
    "node": ">=0.10.3 <15"
  }
}
os
With the os property, you can specify which operating ystems your module will run on. You could also specify if you would like to block a particular os.
{
  "os": [
    "darwin",
    "linux",
    "!win32"
  ]
}
It's not a great option because on the server side it really doesn't make any sense to limit or even show information regarding this as this doesn't affect the end user at all.
cpu
This is similar to os property where you can specify which cpu architecture support.
{
  "cpu": [
    "x64",
    "ia32"
  ]
}
private
As the name clearly suggests, if you set private to be false, then npm will block anyone from publish it.
{
  "private": true
}
That's about it. I have gone through the most important ones. I was able to find some ones which seems extremely arbitrary and so I gave up on it. I hope you enjoyed this article & hopefully will write more articles here.